Lab 50 allows you to setup and configure several emails that are sent automatically as triggered by certain events such as membership sign-up or order completion. These email templates are highly customizable and are often used to relay information to the customer such as order number, estimated pick-up/shipping time, and the store hours.
Sample Email
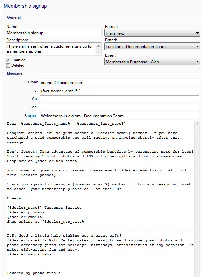
Editing existing messages and adding new options:
- Go to Store Management > Email Messages and Customer Communication.
- Click on Create a new email message on the left panel, or double-click on an existing message to edit it.
The configuration settings are the following:
- Name: Name of the email to be sent out, such as Order Confirmation or Password Reminder.
- Description: Description of event, only viewable within Lab 50.
- Enabled: Make the email active.
- Deleted: Mark this email message as deleted.
- Format: Choose the email format to use for messages. Options include Plain Text or HTML.
- Brand: Used if multiple brands are set for your store. A brand must be selected in order for emails to be sent to customers.
- Event: Select an event from the drop-down list of events to trigger the email. Options include the following: Order Received, Order Printed, Order Ready for Pickup, Order Shipped, Membership Purchase - Web, Membership Purchase - APM, Membership Expiring, Password Reminder, Share Album, Share My Photos, and Upload Complete.
- From: Enter the from email in this format: The Company Name <info@thecompanyhere.com> (This provides the Descriptive from email name, and the reply-to address. The technical from email address will be customerservice@photofinale.com but will look like whatever you have in place of The Company Name in the user's inbox... a custom From email can be purchased if desired.) **
- To: Automatically enters the customer email - % customer_email %
- CC: Select an additional email address to copy on sent messages.
- BCC: Select an additional email address to blind copy on sent messages.
- Message Subject and Body: Several messages are pre-loaded for your convenience. You can modify the text by clicking in the appropriate field and adding/removing text as needed.
3. Make the necessary changes to an existing message, or enter the information for a new message. You can right-click in the “Body” field for the email and select Insert Macro to access a list of available macros to insert into the email such as customer name.
4. When complete, click on Save changes on the left panel.
** More info on the "From" field
All Lab 50 emails are sent from customerserivce@photofinale.com, this is done because of the requirements we go through in order to minimize the chance of our dealers' mail being classified as SPAM. We employ a number of countermeasures:
- SPF Validation
- Sender ID Validation
- DKIM Validation
- Monitor and limit hard-bounce and ISP complaint feedback
(We do offer a custom email address option for an additional fee--ask your sales rep!)
TIPS
1) Add a human-readable name to his emails' From addresses... like:
From: Rachel's Photo <service@rachelsphoto.com>
Then it will show up in a customer's inbox as "Rachel's Photo" rather than "service@rachelsphoto.com". Much nicer.
Not having a "real name" is also one of the tests which makes a message more likely to be identified as spam (known as the "NO_REAL_NAME" test).
2) Changes to the email message content to lower its spam score when analyzed. There are lots of websites and companies that will rate what you've got and help with this effort. A few off-the-cuff recommendations:
- Include the order number in the subject
- Include his store address in the email body