The directions below detail removal and replacement of the hard drive for an EQ-9800 and/or 9850 printer. This should only be done as directed by Lucidiom Technical Support.
Note: Please keep all materials, including the box and padding, as this will be used to return the original hard drive using the provided shipping label.
PART 1: PRINT CONFIGURATION SHEET
Before the replacement takes place, you will need to print out a copy of the current printer configuration for reference in configuring the new hard drive.
To accomplish this, please do the following:
- Place plain, 20lb letter-size copy paper in Tray 1, temporarily replacing the 7x10 Folded Card paper. The letter-sized paper will need to placed in portrait orientation (long edge feed). Be sure to set the guides to the edge of the paper.
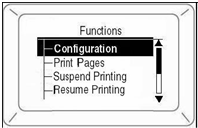
- Press Enter on the front panel of the printer.
- Press the q key until Print Pages is highlighted, and press Enter.
- Press the q key until Configuration is highlighted, and press Enter.
- This will print 3-4 configuration sheets. Please write Original Settings on each page and place them aside, as we’ll be referencing them later on for the new hard drive.
PART 2: HARD DRIVE REPLACEMENT
STEP 1:
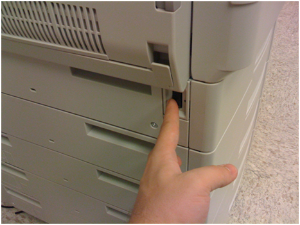
To begin, please shut down the printer. You can do so by holding down the SHUT DOWN/RESTART button until the following message appears on the front panel:
Turn off power or press RESTART button
Once you see this message, flip the black switch on the left-hand side of the printer to completely shutdown the machine
STEP 2:
Locate the maintenance panel on the back of the printer, indicated by two thumbscrews.
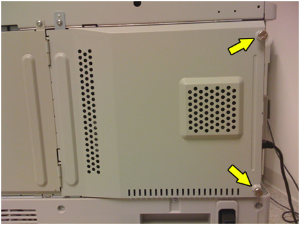
Unscrew both thumbscrews, keeping in mind that they do not unscrew completely and are left attached to the door. Once unscrewed, swing the panel door out to reveal the system mainboard.
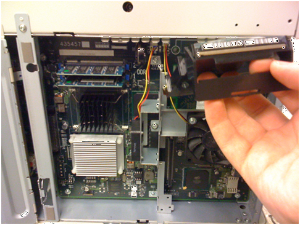
STEP 3:
Identify the hard drive. It is a small, black box on the top, right-hand side above the fan. There is a flap on the front of the drive. Carefully raise the flap about halfway until the drive unlocks from the main board.
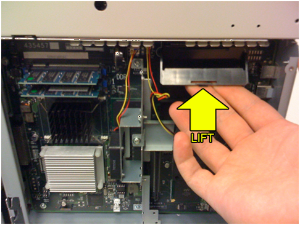
Once unlocked, the drive will be loose. Carefully lift it out of the machine and put it aside.
STEP 4:
Open the box containing the replacement drive. The box should contain a pre-paid return shipping label, along with shipping instructions, and the new hard drive.
Once the replacement is complete, please place the old hard drive in the box, and follow the enclosed instructions.
On the new hard drive, raise the flap and put it aside. Notice the 4 slots on the main board. The new drive will need to be aligned with these slots, and then carefully placed into them.
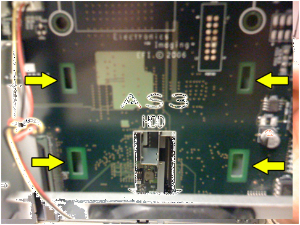
The green circuit board side of the hard drive should be facing the inside of the printer, and the drive connector should be facing down.
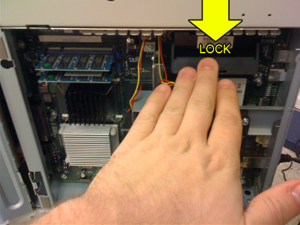
Once the drive has been carefully placed into the slots, gently press down on the front flap until it locks into place.
STEP 5:
Close the door, reattach the thumbscrews, and flip the black switch on the left-hand side of the printer to power it back on.
PART 3: PRINTER RECONFIGURATION
Now that the hard drive has been replaced, we will need to reconfigure some of the printer settings.
First, please print another set of configuration pages, as highlighted in Part 1, and write Post Upgrade on each page. Once these new configuration sheets are printed, put them aside. These new sheets will only need to be referred to by Lucidiom Technical Support in case there is a problem.
From this point on, we will be referring to the original set of configuration pages that you printed, marked as Original Settings.
STEP 1: Reassigning IP Address
Referring to the printed configuration sheets marked Original Settings, locate the area labeled Network Setup. Look for the section beginning with “IPv4 Setup”. We will be referring to the values as entered in this area.
- Confirm that the printer displays (Ready to Print).
- Press q key until (Admin Setup) appears. Press Enter.
- Continue to Setup? displays. Press Enter to select Yes. The printer goes offline and Running Setup displays. This will take about a minute.
- The Setup Menu displays, press q to select (Network Setup). Press Enter.
- Press q to select (Protocol Setup). Press Enter.
- Press q to select (IPv4 Setup). Press Enter.
- Press q to select (Ethernet Setup). Press Enter.
- Enable AutoIP Config? displays. Select No. Press Enter.
- On your configuration sheet, refer to the line marked “IP Address”.
- Enter the IP Address as marked on your Original Settings configuration sheet. Use ?/q to change each octet (groups of 3 numbers). Press Enter to proceed to the next octet. Once the address has been input, press Enter.
- (Subnet Mask) displays. Repeat instructions in steps 9 and 10, but using the “Subnet Mask” line as marked on your Original Settings configuration sheet instead.
- (IPv4 Successfully Bound to Ethernet) displays. Press Enter.
- (Gateway Address) displays. Repeat instructions in steps 9 and 10, but using the “Gateway Address” line as marked on your Original Settings configuration sheet instead.
- Press Enter to exit TCP/IP Setup, Protocol Setup, and Network Setup.
STEP 2: Disable Media Check
Once you have configured the IP Address, as referenced above, then you will be returned to the Admin Setup menu. From here:
- Press q to select (Printer Setup). Press Enter.
- Continue to press Enter until you come to (Media Check).
- Press q to select Off. Press Enter.
- Continue to press Enter > until you see (Save Changes?). Select Yes and press Enter.
- Press Enter to Exit the Setup Menu.
- The printer will restart the server and initialize as normal. (Ready to Print) displays.
STEP 3: Tray Reconfiguration
Next, we will need to reconfigure some of the individual tray settings. To do this:
- Confirm that the printer displays (Ready to Print).
- Press q key until (Menus) appears. Press Enter.
- (Tray Configuration) should be highlighted. Press Enter.
- Press q key until (Auto Tray Switch) is selected. Press Enter.
- Select Off and press Enter.
- Press q key until (Tray 1 Config) is selected. Press Enter.
- Press q key until (Media Type) is selected. Press Enter.
- Press q key until (Glossy) is selected. Press Enter.
- Press the Back button to return to the Tray Configuration menu.
- Repeat steps 6 – 9 for Trays 2, 3, 4, 5, and the MPTray, setting the Media Type to Glossy for each.
- Once finished, press the Back button to return to the main screen where (Ready to Print) displays.
STEP 4: Color Profile Setup
This final step involves re-establishing the use of the preferred default color profile for the printer.
- Open Command Workstation on your machine, (Ex. Start Menu->Fiery->Command Workstation).
- When Command Workstation opens, click on the Administrator key, leave the password blank, and click on the Log In button.
- At the top of the Command Workstation screen, select Server and then Manage Color.
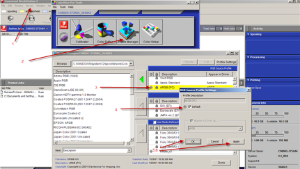
- Click on the Profile Manager button and a new window will appear.
- At the top right of this window, double-click on the sRGB profile.
- In the new window that appears, set it to default and then click Apply and Save.
PART 4: RETURN ORIGINAL HARD DRIVE
The original hard drive needs to be returned shortly upon receipt and installation of the new drive using the return shipping label, box, and padding that the replacement drive came in. Attached to this email is a set of instructions on returning the hard drive with the provided label using the box that the replacement hard drive was shipped in for installation.
- Pack the original hard drive into the box.
- Use the instruction sheet and return shipping label to organize a pick up for the drive.
- For the RMA/RA Number use #60492967 on the return shipping label. This is a very important step.