You will need myLab and Lab 50 to set up a promo.
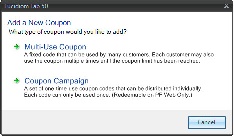
Lab 50 features two different types of coupon setups to accommodate various sales promotions. The option for Multi-Use Coupon is used to create a single coupon code that may be used multiple times by multiple customers. You can specify the maximum number of times a coupon may be used, or you can specify that the coupon should expire at a given point in time. Lab 50 also features the option for a Coupon Campaign. This option allows you to generate multiple single-use coupon codes.
If you are offering a discount and require customers to enter a coupon code to redeem, you will need to set up a coupon before you can configure the discount option. Similarly, if you create a coupon first, you will need to set up a discount that associates with it since the coupon creation solely establishes the limits on the coupon and the code name.
Adding/Editing a New/Existing coupon:
- To create or edit an existing coupon, access Store Management > Coupons.
- Click on the Create a new coupon option on the left panel or select to edit an existing coupon by double-clicking on it.
- Select the type of coupon you would like to create. Your options are Multi-Use Coupon or Coupon Campaign.
For Multi-Use Coupons:
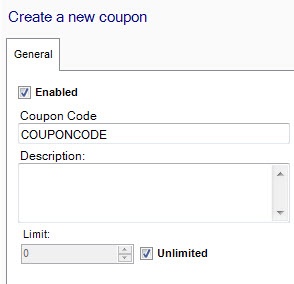
- Fill in the fields with the necessary information. These include the following:
- Enabled: Mark the coupon as Active.
- Code: Enter the code you will require the customer to enter to receive the discount. It may use all letters, all numbers, or a combination of both up to 10 characters.
- Description: Description of the coupon, viewable only in Lab 50.
- Limit: Specify the number of times a coupon can be used, or select unlimited.
- Unlimited: Check the box if you want to allow unlimited use by the customer.
**Note: If you would like for this coupon to be accessible on the kiosk, the EQ Connections options must be setup to synchronize the setup, and the coupon code must use numbers only.
2. When complete, click on Save on the left.
For Coupon Campaigns:
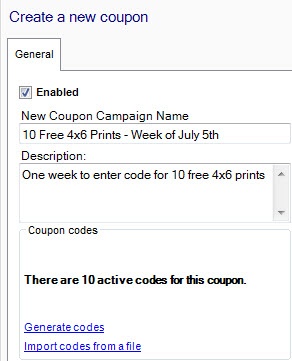
- Fill in the fields with the necessary information. These include the following:
- Enabled: Mark the coupon as Active.
- New Coupon Campaign Name: Name for the new coupon campaign, viewable only in Lab 50.
- Description: Description of the coupon, viewable only in Lab 50.
2. In the box labeled Coupon Codes, you have two options for generating single-use coupon codes.
- Generate Codes: This option will open a dialogue box to walk you through specifying the number of coupon codes, number of characters in the coupon code, coupon prefix, and coupon suffix to use for code generation.
- Import codes from a file : This option will allow you to import a text file listing coupon codes. The text file must list each code as a separate line within the file, and line breaks should be used to differentiate between codes rather than commas or semicolons.
Example: The text below would generate two individual coupon codes.
12345
67890
To generate coupon codes using Lab 50:
- Select the Generate Codes option from within the Create a new coupon window for Coupon Campaign setup.
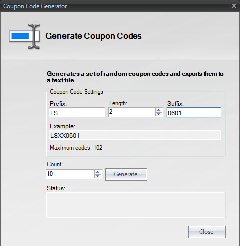
- Complete the required fields to generate your codes. The fields include the following:
- Prefix: The prefix to use for the coupon code. This field is alpha-numeric and limited to four characters.
- Length: The number of digits to use between the prefix and suffix. This value does NOT include the prefix and suffix in the character count. The maximum value is 10.
- Suffix: The suffix to use for the coupon code. This field is alpha-numeric and limited to four characters.
- Count: The number of coupon codes to create.
3. Once you have completed the required fields, the Example: box will generate a preview as well as update the count for Maximum codes: that can be generated using the options you have selected. Once you have verified the settings, press the Generate button, and the Status: window will update dynamically. Please note the longer the code and/or the more codes you need generated will affect the amount of time it takes for the codes to be ready.
4. Once the codes are generated, a dialogue window will prompt you to save the codes as a text file. The file name will default to promo-PrefixvalueCharcountSuffixvalue. In the screenshot example on the right, the default file name was promo-LS20601.txt .
**Note: We recommend saving this file for your records. Codes currently cannot be reviewed in Lab 50.
Multiple Coupons
You can have the following discounts on a single order:
- 1 order-level discount
- 1 free-shipping discount
- 1 tax-exemption discount
- 1 product-level discount *per product*
If a customer ordered a 4x6, 5x7, and 8x10 for home delivery, theoretically they could have 6 separate discount active (3 higher-level discounts & 3 product discounts).
For each of those "discountable entities", the engine will pick the best available discount.
Examples:
- If a customer enters a coupon code that activates a "20% off prints" discount, and the dealer also has an automatic "25% off 4x6 on Mondays" discount, then the 25% discount will apply to the 4x6 and the 20% will apply to the 5x7 and 8x10.
- If there is a promo for 10% off banners and another promo for 10% off the whole order, first the 10% would be taken off of the banner, then order totaled and 10% taken from that subtotal.
- If there is a promo for $5 off a mug and 20% off the order, first the $5 would be taken off the mug price, then 20% would be taken off the order total.
- If there is a promo for 10% off the order and 25% off the order, only the 25% off would apply, as the system will choose the best offer.
- If there is a promo for $2 off 8x10 print and $3 off 8x10 print, only the $3 off coupon would be applied.
- If there is a promo for $2 off a 11x8.5 book with a price of $20 and another promo for $50% off that same book, the book would be $10 as only the 50% coupon would be applied as just 1 product-level discount is applied.
Option to restrict to one code per order: Dealers who want to limit customers to being able to enter only one coupon code per order can contact support to enable that option. (Once the user enters one code, the button to enter more is removed...so if you have a code for mugs and a code for canvas and the customer orders both products, they can only enter one of those promotions.) However, even with the single-coupon setting, there could still be multiple discounts applied to an order depending upon a dealer's configuration since a) not all discounts require a coupon, and b) a single coupon code can activate multiple discounts. Also, please note that the Pocket Pics iPhone app only allows one code to be entered, regardless of this setting.
Helpful Tips
For more details, click into the child pages listed below.
- Where to set up: Coupons and Promos can only be set up in Lab 50.
- In a nutshell: Your sale can require user to enter a code OR, it can be based on what they purchase, with no need to enter a code. Most dealers require a code...to set this up, go to Store Mgmt > Coupons and define your code. Then go to Store Mgmt > Product discounts and promos and set your requirements (the conditions that need to be met, and the award once those conditions are met) for the promo.
- Multi-use coupons vs campaign: When creating your coupon code, most of the time you will create a Multi-use coupon. A Campaign would be for something like a Groupon, where the user essentially buys a unique code.
- Unlimited coupons: After you choose your type of coupon, you have the option to limit its use–this means limit the total number of times that code can be used overall...not per user. Most of the promos dealers use are set to Unlimited. Limiting the coupon would come into play for a promo where you are offering it to the first X people. "Free mug to the first 100 people to place orders" (limit=100). Or, if you want to test or give a "10 free whatevers" to someone... limiting use to an exact number will ensure the code can't be misused. There are other ways in the Promo section to limit coupon use (such as by date, by members-only, by day, and of course by what the coupon is valid for).
- Set valid dates: You will need to set a start and end date for the discount...this means you can set up your promos in advance! Or, you can easily resurrect a coupon from the past by adjusting dates.
- Product tags: When you set up the Conditions and Award, Product Tags are super helpful. We have set up a number of them (which you should check before using) but you can set up your own! To set these up, go into myLab and Store Mgmt > Product Tags. You create your own tag, then add the products that you want to be part of that group. Then, you can base your discount on that tag. Once you have added products to the product tag, ensure that the product cache is flushed by making a data change to any product. The change can be to any product, it does not need to be one of the products you've added to the new product tag. The simplest thing to do is just go into any product and add a space to the end of the description and then save it. If, when you return to Lab 50 and the tag you set up in myLab is not showing for selection in Lab 50, close Lab 50 and delete your Temp folder (located here... C:\Program Files (x86)\Lucidiom Lab 50\) then restart Lab 50.
- Include vs exclude: In the Awards tab, when you have the same product as the requirement (condition) and the award, you get this choice... Exclude is ticked by default, and SOMETIMES the Include is greyed out. If it's grey and you want to choose it, save your promo, then reopen and it will be available.

Promoting your coupon
Include the coupon code in the link to the product group. Read here for how to do it: https://www.photofinale.com/linked-coupon-codes/