Requirements
- Photo Finale Kiosk (PFK) requires Windows 8.1 x64 or higher.
- Administrative rights are required to run the installer, but the user account used to run PF Kiosk does not need to be a local administrator.
- Computer must be connected to the internet.
- A Photo Finale Website online catalog. (The kiosk will use the same one as your PF website. If you do not have a website, you will need one, although whether you take online orders is optional–email support@photofinale.com and we will set one up for you.)
Prerequisites
- The following four prerequisites must be installed, in the order shown, before running the installer. You may download them individually from these links, or download one zip file:
- Alternatively, you can download this .ZIP file, which has all 4, named in the order in which they should be installed: https://secure.photofinale.com/share/dev/pfkiosk/prerequesites.zip
Installation
- License: A license for the PF Kiosk software is being included with the current term of all kiosk existing support agreements and license subscriptions, as of Jan. 1st. If you pay a yearly fee, this is included. If you pay a subscription rate, this is included. If you are out of support, you will need to be back under a support contract in order to install.
- Kiosk ID: Your PF Kiosk ID will be the same as your APM ID for that machine and will continue with support and expiration under that ID, just as with any software update did under the old APM kiosk.
- Installation: Once you have the prerequisites installed, run the PF Kiosk installer: The link to the most current version is in the Software & Downloads section of myLab under the "Photo Finale Kiosk" section.
- Activation: Your first time installing the new PF Kiosk will have the additional step of activating the license. Please enter the existing Kiosk ID and your Dealer Code to activate. Once the installer has finished running, the kiosk will reboot and you will be ready to take orders.
- Re-install: In the case where you are updating from an earlier or beta version of the new PF Kiosk, you do not need to delete the previous version. The installer will automatically overwrite any existing version of PFK, and will even take care of shutting down all of the apps first if you've forgotten.
- Update/install Lab 50: Lab 50 has a new update as well. The link to the most current version is in the Software & Downloads section of myLab under the "Photo Finale Kiosk" section.
What Gets Installed for PF Kiosk
- The home directory for the PFK software is c:\PF Kiosk\
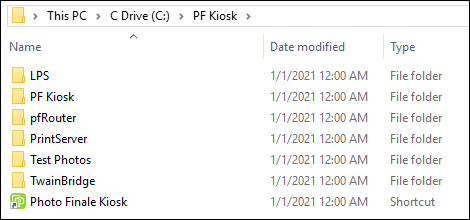
- The software consists of five apps which are installed into separate subdirectories:
| Directory | App | Description |
|---|---|---|
| PF Kiosk | Photo Finale Kiosk.exe | The main kiosk app. |
| LPS | LocalPhotoService.exe | Provides support for local media files (media cards, USB, and CD/DVD). |
| pfRouter | pfRouter.exe | Provides support for order routing after order submission. |
| PrintServer | PrintServer.exe | Provides support for kiosk receipt printing. |
| TwainBridge | TwainBridge.exe | Utility for the forth-coming flatbed scanning functionality. |
- A shortcut to Photo Finale Kiosk.exe (PFK.exe) is installed in the root of the folder, as well as on the desktop.
- PFK.exe is the only app that needs to be launched. It takes care of launching its three helper apps, as well as monitoring and restarting them as needed.
- The new PFK installer will set the computer to prevent the old APM from running at startup.
Test Photos
- The installer includes an option to also install a small batch of test photos. This will allow you to easily demo the kiosk with photos loaded from the hard drive (by double-tapping a hidden button in the upper-right corner of the Import page), without having to insert a media card or USB.
- Whether you choose to install the test photos or not, you can always place photos into this directory on your hard drive and PFK will automatically find them during a kiosk session if you invoke demo mode by double-tapping on the Import page: c:\PF Kiosk\Test Photos\
Touch Interaction
- If installing on a machine with a touchscreen, it is recommended that you enabled Windows Tablet mode to take full advantage of the touch screen and on-screen keyboard capabilities of the system.
- This setting can be enabled in Settings > System > Tablet mode.

Configuration
- All configuration for PFK is done centrally in myLab, under Store Management > PF Kiosk. The configuration is broken up into 4 tabs:
1. Licenses
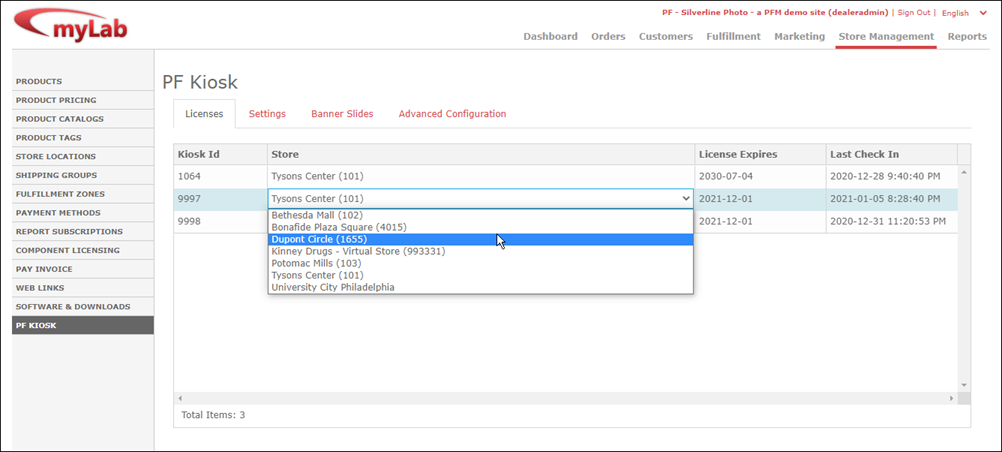
- The Licenses tab lists all of your licensed Kiosk IDs, when they expire & when they have last checked-in with the servers. It also allows you to assign each Kiosk ID to the appropriate store location, using the dropdown list. This assignment is important because orders placed on the kiosk will automatically default to this selected store location for pickup.
2. Settings
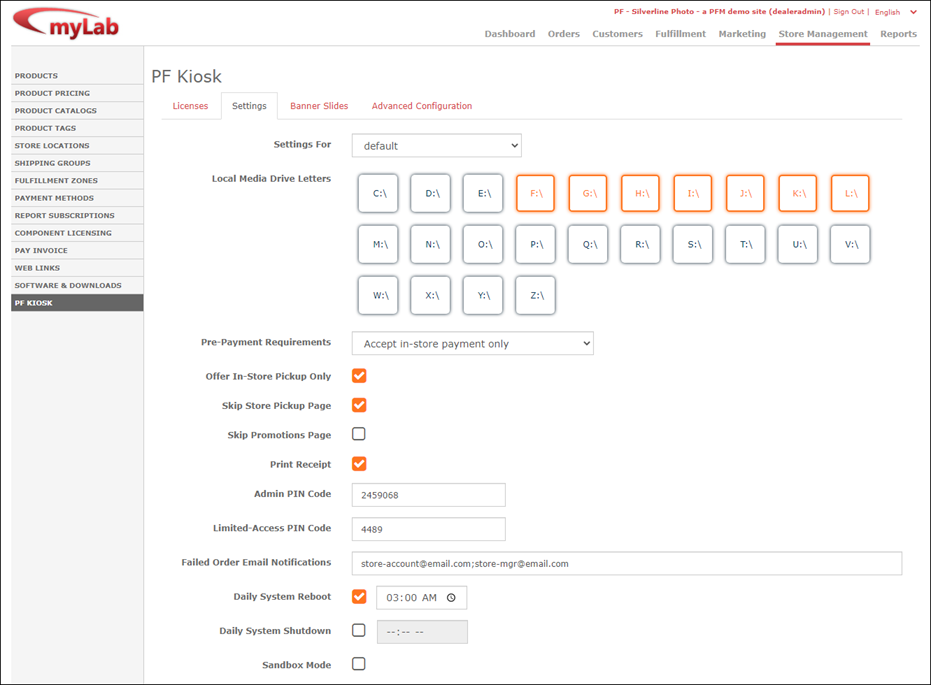
- The Settings tab gives you easy control over the most common PFK settings. Changes are saved automatically as you make edits.
- The "Settings For" dropdown allows you to select which Kiosk ID the settings will be applied to. You begin by configuring your default settings which will apply to all kiosks. You can then select individual Kiosk IDs from the dropdown and override just the specific settings that you wish to change for the kiosk.
3. Banner Slides
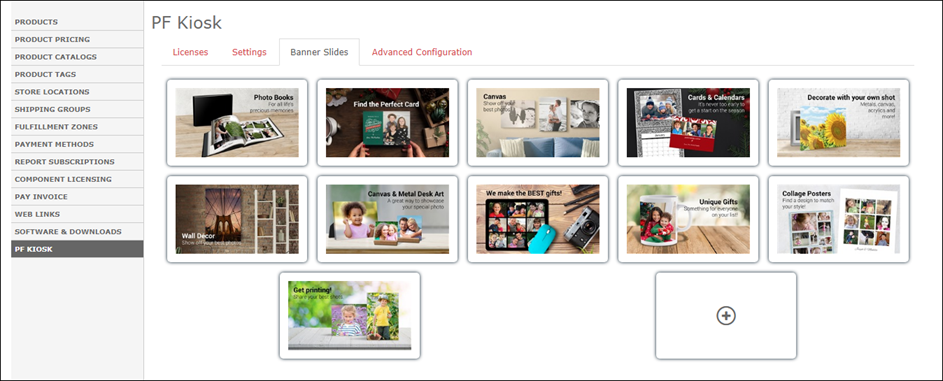
- The Banner Slides tab allow you to configure the slideshow of banner ads displayed on the kiosk Home page.
- Click the
 button to add a new slide. You can select from our built-in slide graphics, or upload your own.
 - You can click and drag slides to rearrange their order.
- When you hover over a slide, buttons appears to delete the slide or access the slide options.

- In the Edit Slide window, you can choose the animation transitions for the slide's entrance and exit, along with the time it remains on screen. Click the white Play button in the bottom-right corner will display a preview of your selected transition & wait settings. The Start Date and End Date settings allow you to schedule slides to appear for a limited period, such as a seasonal or weekly promotion.

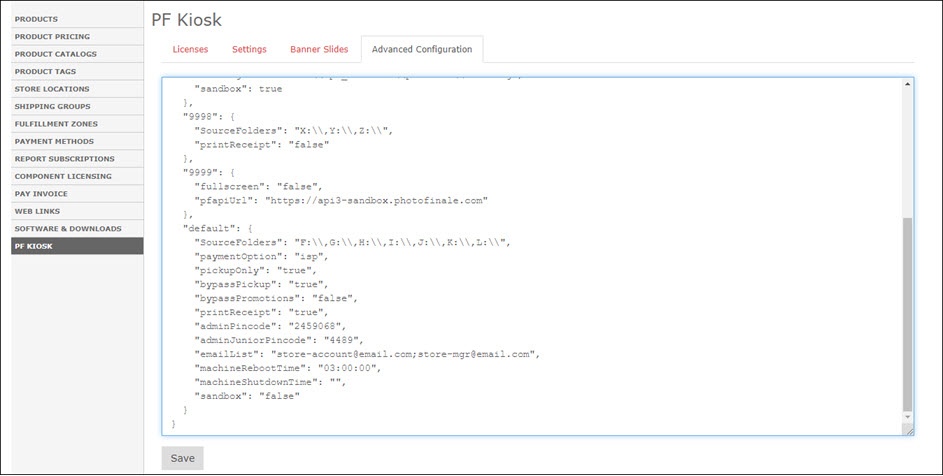
4. Advanced Configuration
- The Advanced Configuration tab allows access to some esoteric settings that should only be adjusted under advisement of the support team. Unlike the Settings tab, changes on the Advanced tab are only committed to the database when the Save button is tapped.
Operations
Kiosk Usage
- When using the EasyLink Mobile Upload to import photos, in addition to scanning the QR code or sending an SMS to your mobile number, you can also click on the QR code and the link will be copied to your clipboard. You can then alt-tab to a browser window outside of PFK and paste the link in and proceed.
- After an order is placed, the kiosk will automatically reset after 12 seconds. Note: if you move your mouse this counter is reset.
Admin Keystrokes
| Key Combo | Function |
|---|---|
| CTRL-SHIFT-L | Quit PF Kiosk |
| CTRL-SHIFT-M | Minimize PF Kiosk |
| CTRL-SHIFT-P | Navigate to the Platform Info page |
Accessing the Admin Page
Get to the admin menu by tapping the hidden button near the top-left corner of the Home page. The Admin PIN Code can be set in myLab.

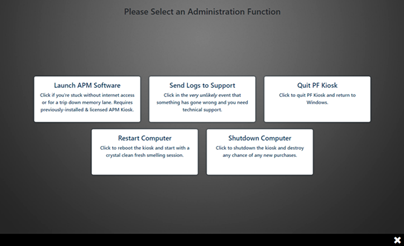
From the Admin screen, an operator can:
- Launch the APM (if installed & licensed) [this feature was for beta and will be removed in a coming release]
- Send log files to support
- Quit PF Kiosk
- Restart the computer
- Shutdown the computer
A second, lesser-privileged PIN code option can also be configured in myLab for store personnel use, which only gives access to:
- Send logs to support
- Restart the computer
- Shutdown the computer
Known Issues
- None presently
Roadmap
The following features & functionality are already on our roadmap but feel free to offer input & suggestions:
- Flatbed Scanning
- Passport Workflow
- Ability to order CD / DVD / USB backup, separate from prints