...
| Advanced Tables - Table Plus | ||||
|---|---|---|---|---|
| ||||
|
Editing Existing Messages and Adding
...
New Options:
- Go to Store Management > Email Messages and Customer Communication.
- Click on Create a new email message on the left panel, or double-click on an existing message to edit it.
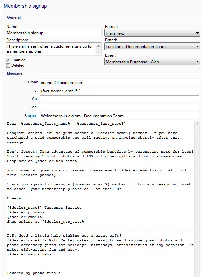
Panel borderColor black titleBGColor lightgrey title Configuration Options Explained borderStyle solid - Name: Name of the email to be sent out, such as Order Confirmation or Password Reminder.
- Description: Description of event, only viewable within Lab 50.
- Enabled: Make the email active.
- Deleted: Mark this email message as deleted.
- Format: Choose the email format to use for messages. Options include Plain Text or HTML.
- Brand: Used if multiple brands are set for your store. A brand must be selected in order for emails to be sent to customers.
- Event: Select an event from the drop-down list of events to trigger the email.
Options include the following:- Order Received
- Order Printed
- Order Ready for Pickup
- Order Shipped
- Membership Purchase - Web
- Membership Purchase - APM
- Membership Expiring
- Password Reminder
- Share Album
- Share My Photos
- Upload Complete
- From: Enter the from email in this format: The Company Name <info@thecompanyhere.com> (This provides the Descriptive from email name, and the reply-to address.
The technical from email address will be customerservice@photofinale.com but will look like whatever you have in place of The Company Name in the user's inbox.)
- To: Automatically enters the customer email - % customer_email %
- CC: Select an additional email address to copy on sent messages.
- BCC: Select an additional email address to blind copy on sent messages.
- Message Subject and Body: Several messages are pre-loaded for your convenience. You can modify the text by clicking in the appropriate field and adding/removing text as needed.
- Make the necessary changes to an existing message, or enter the information for a new message. You can right-click in the “Body” field for the email and select Insert Macro to access a list of available macros to insert into the email such as customer name.
- When complete, click on Save changes on the left panel.
...