...
- At the top of the Menu bar, select Settings.
- On the left panel select Photo Processing > Auto Enhancement.
- Check the box Enable auto enhancement processing.
- Click on the Add button at the bottom of the right panel to begin the setup of a new Channel.
| Wiki Markup |
|---|
{| Advanced Tables - Table Plus |
|---|
:align=center|columnAttributes= | | style="text-align:center;" | | align | center |
|---|
|
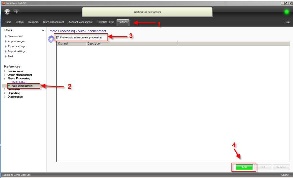 Image Added Image Added
|
|
5. When the new dialogue box appears, enter a Name for the New Channel (Ex. Minilab).
6. (Optional) In the Description field, enter a brief description of the channel (Ex. This is the I2E channel for our minilab to sharpen and redden images for color accuracy).
7. Leave the box Enable this Channel checked.
8. (Optional) A sample image may be used as a litmus test for the settings for this channel. Click on the _Select a
preview photo_ link, and then locate the image you would like to use as a sample using the windows dialog box. You can also change this image at any time to see how the settings affect different test images.unmigrated-inline-wiki-markup
{| Advanced Tables - Table Plus |
|---|
:align=center|columnAttributes= | | style="text-align:center;" | | align | center |
|---|
|
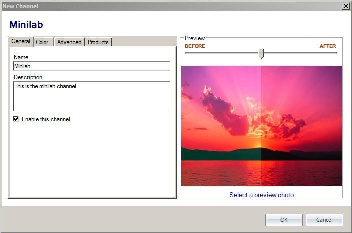 Image Added Image Added
|
|
**Note: The sample image(s) needs to be a Jpeg file and in landscape formatting.