...
- Place plain, 20lb letter-size copy paper in Tray 1, temporarily replacing the 7x10 Folded Card paper. The letter-sized paper will need to placed in portrait orientation (long edge feed). Be sure to set the guides to the edge of the paper.
- Press Enter on the front panel of the printer.
- Press the q key until Print Pages is highlighted, and press Enter.
- Press the q key until Configuration is highlighted, and press Enter.
- This will print 3-4 configuration sheets. Please write Original Settings on each page and place them aside, as we’ll be referencing them later on for the new hard drive.
| Wiki Markup |
|---|
{| Advanced Tables - Table Plus |
|---|
:align=center|columnAttributes= | | style="text-align:center;" | | align | center |
|---|
|
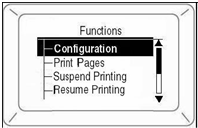 Image Added Image Added
|
|
PART 2: HARD DRIVE REPLACEMENT
...
Once you see this message, flip the black switch on the left-hand side of the printer to completely shutdown the machineunmigrated-inline-wiki-markup
{| Advanced Tables - Table Plus |
|---|
:align=center|columnAttributes= | | style="text-align:center;" | | align | center |
|---|
|
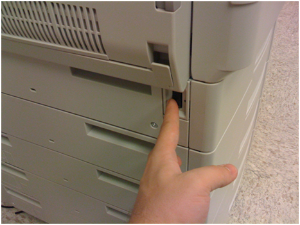 Image Added Image Added
|
|
STEP 2:
Locate the maintenance panel on the back of the printer, indicated by two thumbscrews.unmigrated-inline-wiki-markup
{| Advanced Tables - Table Plus |
|---|
:align=center|columnAttributes= | | style="text-align:center;" | | align | center |
|---|
|
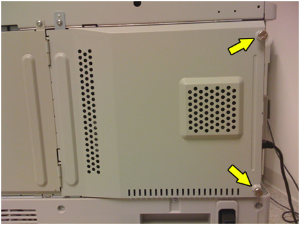 Image Added Image Added
|
|
Unscrew both thumbscrews, keeping in mind that they do not unscrew completely and are left attached to the door. Once unscrewed, swing the panel door out to reveal the system mainboard.
...
Identify the hard drive. It is a small, black box on the top, right-hand side above the fan. There is a flap on the front of the drive. Carefully raise the flap about halfway until the drive unlocks from the main board.unmigrated-inline-wiki-markup
{| Advanced Tables - Table Plus |
|---|
:align=center|columnAttributes= | | style="text-align:center;" | | align | center |
|---|
|
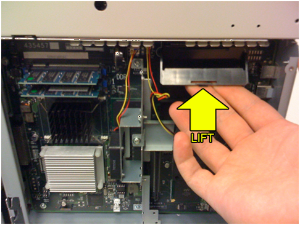 Image Added Image Added
|
|
Once unlocked, the drive will be loose. Carefully lift it out of the machine and put it aside.unmigrated-inline-wiki-markup
{| Advanced Tables - Table Plus |
|---|
:align=center|columnAttributes= | | style="text-align:center;" | | align | center |
|---|
|
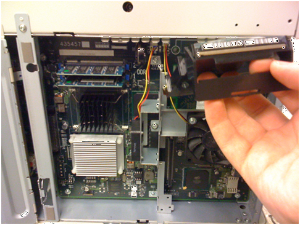 Image Added Image Added
|
|
STEP 4:
Open the box containing the replacement drive. The box should contain a pre-paid return shipping label, along with shipping instructions, and the new hard drive.
...
On the new hard drive, raise the flap and put it aside. Notice the 4 slots on the main board. The new drive will need to be aligned with these slots, and then carefully placed into them. unmigrated-inline-wiki-markup
{| Advanced Tables - Table Plus |
|---|
:align=center|columnAttributes= | | style="text-align:center;" | | align | center |
|---|
|
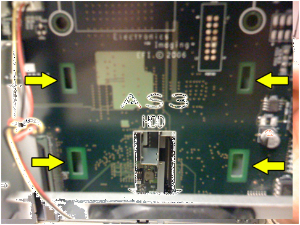 Image Added Image Added
|
|
The green circuit board side of the hard drive should be facing the inside of the printer, and the drive connector should be facing down.
Once the drive has been carefully placed into the slots, gently press down on the front flap until it locks into place. unmigrated-inline-wiki-markup
{| Advanced Tables - Table Plus |
|---|
:align=center|columnAttributes= | | style="text-align:center;" | | align | center |
|---|
|
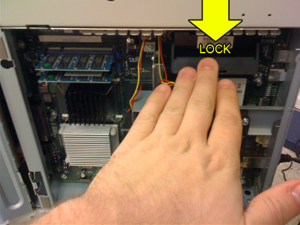 Image Added Image Added
|
|
STEP 5:
Close the door, reattach the thumbscrews, and flip the black switch on the left-hand side of the printer to power it back on.
...
- Open Command Workstation on your machine, (Ex. Start Menu->Fiery->Command Workstation).
- When Command Workstation opens, click on the Administrator key, leave the password blank, and click on the Log In button.
- At the top of the Command Workstation screen, select Server and then Manage Color.
- Click on the Profile Manager button and a new window will appear.
- At the top right of this window, double-click on the sRGB profile.
- In the new window that appears, set it to default and then click Apply and Save.
...
{| Advanced Tables - Table Plus |
|---|
:align=center|columnAttributes= | | style="text-align:center;" | | align | center |
|---|
|
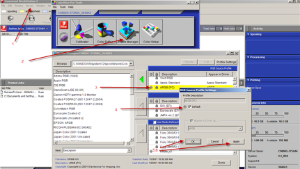 Image Added Image Added
|
|
PART 4: RETURN ORIGINAL HARD DRIVE
...