Please follow these steps to configure the Shinko printer for optimal color quality. Keep in mind that once you make these changes, this will provide the most optimal output that the printer is capable of giving. Any additional color problems will have to be adjusted manually using the color correction feature of the driver (Printing Preferences > Color > Color Correction and Advanced > Printing Defaults > Color > Color Correction).
1. Click on the Start Menu, then navigate to Settings, and then Control Panel
2. Open up the Printers and Faxes control panel
3. Right-click on the Shinko driver and select Properties.
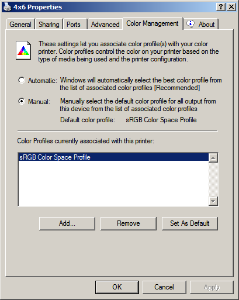
4. Click on the Color Management tab.
5. Select the Manual radio button.
6. Under Color Profiles currently associated with this printe, hit the Add button.
7. You’ll be given a file browser screen and pointed to the "C:\WINDOWS\system32\spool\drivers\color" directory.
8. Browse through the list until you see the file labeled sRGB Color Space Profile.icm. Select it and then hit “OK”. The sRGB profile will now show up in the profile list.
9. Select the newly added sRGB profile and hit Set As Default.
10. If there are any other color profiles in the list, select them and hit the “Remove” button so that the sRGB profile is the only profile listed.
11. Click on the General tab.
12. Click on the Printing Preference button.
13. Select the "Color" tab
14. Under "ICM Method", use the dropdown box to select "ICM Disabled".
15. Under "ICM Intent", use the dropdown box to select "Pictures (Contrast)".

16. Press the OK button.
17. Click on the "Advanced" tab, then "Printing Defaults".
18. Repeat steps 13 through 16.
19. Hit then OK button when finished.
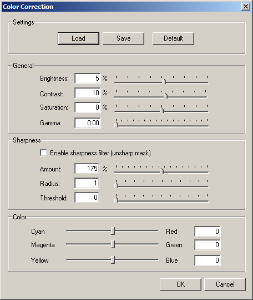
After correcting these settings, you can also manually change the color balance by clicking on the "Color Correction" button in the "Color" tab. This will allow for fine adjustments in the output. Use the preview windows to judge the final result.