The KIS-DKS Printer interface allows the APM or Lab 50 software to convert orders generated from an into a format that the KIS-DKS printer can accept and print.
Prerequisites
Required Environment Variables for DKS
1. The APM and/or Lab 50 machine needs to be able to see the DKS machine across the local area network and vice versa. There are some special considerations for the networking, and based upon the current network configuration, some or all of these items may need to be setup in order to print to the DKS:
- Since the DKS is not a network aware minilab, and orders must be sent to the DKS machine, it is imperative that the APM or Lab 50 machine be able create, move, and edit files in the DKS shared directory named rep_dks (\\Dks\rep_dks), as well as its sub-directories.
- The DKS machine has an IP address of 192.168.0.1 and a custom subnet mask of 255.255.0.0, but this can be changed on the DKS to get it on the existing local network.
**Note: These settings are overwritten anytime a DKS receives a software update, so if a customer does change the DKS network settings, they should definitely record what the IP address is before updating. It will always need to be a static IP.
- The workgroup name of the DKS minilab is IMPAG. If need be, the Lab 50 machine or the APMs printing directly to it may need to be configured to be part of this workgroup.
- The username for the minilab is DKS and the password is blank. This username may need to be added to the local users group on the
machine running Lab 50 (or on the APMs if they are sending the orders to the DKS individually).
2. The DKS paper sizes in use will need to be known prior to setup, so the products in the APM and/or Lab 50 software can print to the correct paper.
3. On the machine or machines sending the orders, special settings may need to be added to the ‚Environment Variables? settings in Windows XP.
**Note: This should be done for you by the APM software Installer, but if this is not the case, follow these instructions:
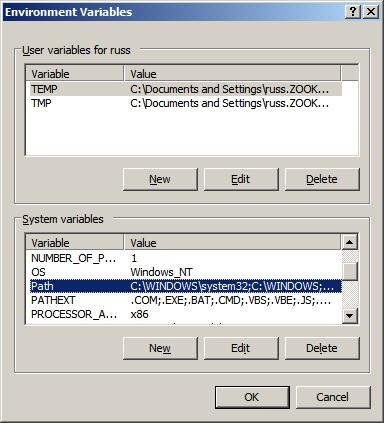
System Variables Window
- Right-click on the My Computer icon.
- Select Properties.
- Click on Advanced.
- Click on the Environment Variables.
- At the bottom half of the screen in the System Variables section, scroll down until the PATH option appears.
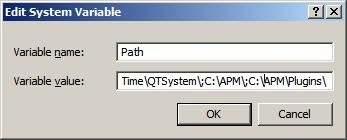
- Highlight PATH and then click on Edit.
- In the variable value field, scroll to the end of the field and then enter the following right after the last character: *;C:\APM\;C:\APM\Plugins*
- Click the OK button to save the changes.
- Click the OK button again on the Environment Variables window to close it.
- Click the OK button to close the System Properties window.
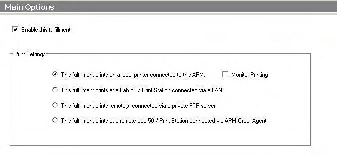
4. If Lab 50 is not present in the local installation, then at least one or more fulfillments must be enabled to print to a local printer connected to the APM. This is seen in the screenshot on below, taken from the main options of an enabled fulfillment in the Setup Wizard.
Print Settings
Setting Up the DKS Interface Using the Setup Wizard
The Setup Wizard is used to configure the APM to print to the KIS-DKS Printer Interface.
This process includes the following steps:
1. Adding the printer interface and editing the general settings.
2. Setting DKS priority levels.
3. Product setup from within the interface.
4. Assigning printable products to the interface.