About Facebook Connect
The Facebook Connect add-on component can be added to a Standard APM or an EQ Pro licensed kiosk. The Facebook Connect option allows customers to download photos from their Facebook account and/or upload photos from the kiosk directly into a new album on Facebook. Additionally, it allows the customer to post a link to their Facebook wall that links back to Photo Finale Web allowing their friends the option to order the photos direct from your lab.
Customers are able to access all photo albums that exist within their Facebook accounts and may select to download from multiple albums at once. Photo uploads are limited to the Facebook-standard of 200 photos per album and are accessible usually within an hour of upload depending on your lab's internet access speed, number of photos to upload, and network traffic. Once the album is posted to Facebook, customers are able to tag photos and edit album options such as name and description as if they had uploaded the photos direct from home.
An update for the Facebook Connect add-on component was released on March 1, 2011. If you have not installed this update, you will need to first confirm you are currently using APM version 7.5.1.56 then install the Facebook Connect Update. It may be downloaded from the Lucidiom Support site.
Ordering Facebook Upload
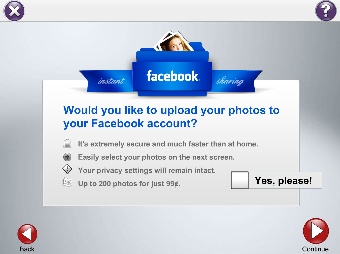
Once you have enabled Facebook Connect in the Setup Wizard, the APM software will display options for customers to upload and/or download photos while placing an order. The Facebook photo download option appears on the media selection screen at the beginning of an order. The Facebook upload option may be ordered two ways within the APM software:
- Select the Facebook Upload button on the Product Selection screen, or
- Opt to order it through the up-sell screens, after placing an order. Once a customer elects to Checkout, the Facebook Upload up-sell screen will be displayed before the Order Summary screen.
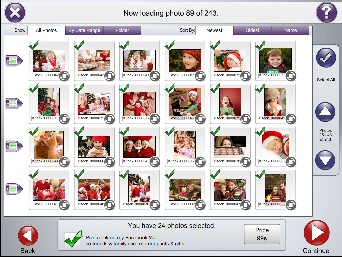
Once you have selected an option, you will be taken to the Image Multi-Select screen.
Use the Image Multi-Select screen to indicate which photos you would like to include in your upload.
Description of Features:
- Touch a thumbnail to select it. Selected images will have a green checkmark over them.
- Use the rotate button in the right corner of each thumbnail to rotate the image in 90-degree increments.
- The bottom of the screen reports the number of photos you have selected for upload.
- The side panel buttons are used to scroll through your list of images. If a scroll button is disabled (faded), either the end or the beginning of the image set has been reached.
- Press the Select All button to select all the photos on the screen.
- Post a link on my Facebook Wall: Allows the customer to opt whether or not a link should be posted on Facebook to allow friends to order photos online using their photos.
- Use the options in the Sort By tabs to order the thumbnails by the method indicated:
- Name orders the thumbnails alphabetically, from A-Z (ascending), based upon the filename of the images. This is the default selection.
- Oldest sorts the thumbnails from oldest to newest, based upon the file creation date and time of the image.
- Newest sorts the thumbnails from newest to oldest, based upon the file creation date and time of the image.
**Note: The Oldest and Newest tabs use the actual file creation date/time of the image file to determine the sort order. On some cameras, this may differ from the date/time that the image was actually taken.
8. Use the options in the Show tabs to filter which thumbnails are displayed based upon the chosen method:
- All Photos shows all images that have been loaded into the APM software. This is the default selection.
- By Date Range filters the images that are shown based upon a specified date range. When selecting this tab, a window will display options to specify the date range. Use the + and – buttons to change the dates. When finished, press Filter.
- Folder filters the thumbnails based upon certain subdirectories on the inserted media. When selecting this tab, a window will display a list of the subdirectories of all the media inserted. To filter by a particular subdirectory, select it and press Filter.
9. Post a link on my Facebook wall so friends and family can re-order prints & gifts.: This option allows the customer to post an additional link to the photos for easy ordering through Photo Finale Web. This checkbox will only appear if it is enabled in the Setup Wizard.
10. Press the Continue button once all the images you wish to add to the upload product have been selected.
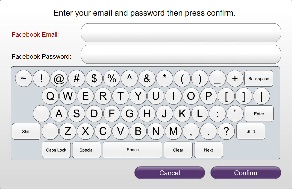
11. The Facebook credentials screen will then launch and prompt you for your account information in order to complete the Facebook upload product.

Configuration
Facebook Connect is a premium add-on license that allows customers to download photos from and/or upload photos to Facebook from the kiosk as well as post a link for ordering their prints through Photo Finale Web. If you are not currently licensed for Facebook Connect, please contact your regional sales representative for information.
Minimum Version Requirement for Facebook Connect
**Note: This feature appears in APM 7.5.1.56 and later and requires an add-on license.
- Click on the APM Add-On Components option in the Category Navigation Pane.
- Click on the Facebook Connect Settings option in the Primary Navigation Pane.
- Click on the Enable Facebook Upload checkbox at the top of the Customization Pane.
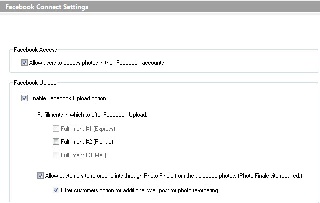
- To enable photo downloads from Facebook, check the box to Allow users to access photos in their Facebook accounts at the top of the Customization Pane.
- To enable photo uploads to Facebook, check the box to Enable Facebook Upload option.
There are a few additional options that you as the retailer can control. The options are listed below.
|
|
|
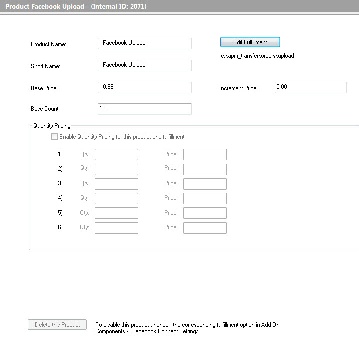
Facebook Connect Settings |
Once you've enabled the option for Facebook Connect, the Facebook Upload product will need to be priced for any Fulfillment Service Option where this is enabled. Facebook Upload Image Count and Folder Location
|
|
|
Pricing Setup |