You can select the Choose Photos option from the Quick Order screen to select individual images from your set. In this case, use the Photo Index screen to indicate the size and quantity of the photos to print. Products are displayed according to the configuration of the APM and the print fulfillment option you have selected.
Photo Index Screen
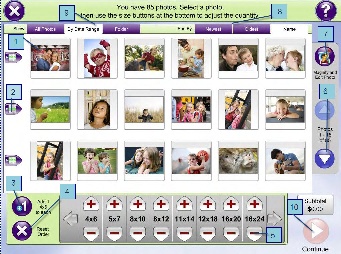
Description of Features:
- Touch an image to select it. The image that is currently selected is highlighted green.
- Press one of the three arrow buttons on the left to select all the images in that row. To unselect all the images in a row, press the arrow again.
- Press the Add 1 4x6 to each button to quickly add a quantity of 1 4x6 size to every image loaded for the order.
- Press the Reset Order button to clear the sizes selected for each image and begin again.
- Use these buttons to increase or decrease the number of prints you would like to order for the selected photo(s). A colored tab will appear underneath the image with the quantity and size currently marked for each photo. Use the arrows to the left and right of the size listing to view more print sizes for ordering.
- Use these buttons to scroll through your list of images. If a scroll button is disabled (faded), either the end or the beginning of the image set has been reached.
- Press the Magnify and Edit Photo button to view a larger version of the photo you have selected and to access the editing tools (e.g. red eye removal, cropping and color correction). See the following sections in this chapter to learn about these features.
- Use the options in the Sort By tabs to order the thumbnails by the method indicated:
- Name orders the thumbnails alphabetically, from A-Z (ascending), based upon the filename of the images. This is the default selection.
- Oldest sorts the thumbnails from oldest to newest, based upon the file creation date and time of the image.
- Newest sorts the thumbnails from newest to oldest, based upon the file creation date and time of the image.
9. Use the options in the Show tabs to filter which thumbnails are displayed based upon the chosen method:
- All Photos shows all images that have been loaded into the APM software. This is the default selection.
- By Date Range filters the images that are shown based upon a specified date range. When selecting this tab, a window will display options to specify the date range. Use the + and – buttons to change the dates. When finished, press Filter.
- Folder filters the thumbnails based upon certain subdirectories on the inserted media. When selecting this tab, a window will display a list of the subdirectories of all the media inserted. To filter by a particular subdirectory, select it and press Filter.
Date Range Screen Folder Select Screen


10. Press the Continue button once all print sizes have been chosen and editing is complete.