To create a new product for online ordering, you will need to access Store Management > Product Catalog in Lab 50. On the left-panel, click on the New button, and you will be prompted to select the type of product you would like to create and enter a name and price for the product. If you are creating a Membership Plan or Purchase Plan, the information entered in the Description box is the information that will be displayed on your website when the customer selects to purchase a Membership Plan or Purchase Plan.
Creating a new product
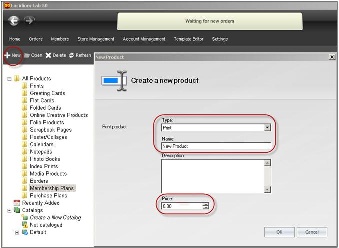
There are several types of products, and the settings for a given product will depend on its type. The product types include the following:
- Print: Standard print products such as Wallet, 4x6 and 5x7.
- Greeting Card: Customized template-based greeting cards.
- Flat Card: Customized template-based greeting cards. Another name for greeting card.
- Folded Card: Duplexed greeting card that typical features a photo on the front with space available for customization within the card.
- Online Creative Product: Online products utilizing templates and styles. This product type is used by Lucidiom for online folio content.
- Folio Product: Products that are printed duplexed, such as Luci Templates, Folded Cards, Calendars, etc.
- Scrapbook Page: Template product featuring designer layouts. Printed single-side.
- Poster/Collage: Template product featuring locked layout for creating designer posters and collages.
- Calendar: Duplexed calendar featuring customer photos and important dates.
- Notepad: product typically features 50-100 page notepad customized with customer photo and/or text.
- Photo Book: Photo books that are printed duplexed. These products require templates.
- Index Print: Index prints are specific to Lucidiom Kiosk integration only and are not supported for online ordering using this option.
- Media Product: Used to setup a custom cd or dvd product.
- Border: A template product that can be applied to prints.
- Membership Plan: Allows customers to sign up for a membership plan.
- Purchase Plans: Allows customers to purchase a pre-paid plan for products offered.
Once you have entered the necessary information, click the OK button. The next screen will prompt you for additional information such as the product height/width, DPI, product weight (for calculating shipping, if applicable), and fulfillment type you'd like to use for processing orders. Please keep in mind that the fulfillment type you select may require additional configuration.
You may also specify whether or not a template should be applied to the product and which templates are available for the product using the Styles tab. Lastly, the Price Tiers tab allows you to specify multiple price points as the quantity of a particular product ordered increases. When you have completed the product setup, click on the Save Changes option on the left panel to complete setup.
Editing Product Information
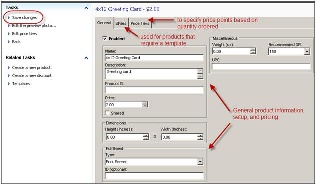
General tab Settings
- Enabled: When this is checked, customers are allowed to see and order the product. Once the product is enabled, it will have a green dot to the left of the product name in the product catalog.
- Product name: The name of the product as you would like it to appear on your website.
- Price: The base price for the product.
- Description: Description of the product for viewing in the order summary. Viewable within the Lab 50 software only.
- Product ID: For products being processed through the Print Server. This option may be grayed out if it is a pre-existing product in the product database.
- Height: Height of print. (Ex: 4.00 for 4x6)
- Width: Width of print. (Ex: 6.00 for 4x6)
**Note: Even with metric products, the correct height and width is set in inches.
- Paper Finish: Check the boxes to offer the print in Glossy, Matte, or both surface finishes.
- Fulfillment Type: This is the method on how the product will be produced. The options are:
- None
- Output Folder
- Print Server (recommended for most every product including products for the EQ-9800 and other toner based printers.)
- ADRS
- Adobe PDF
- Weight: Enter the product weight if you charge for shipping products based on weight.
- Recommended DPI: The Minimum DPI recommended for each product. The customer will receive an alert if the minimum DPI is not met with their submitted image.
- UPC: Used only for cross-referencing your own inventory.
Layout tab Settings:
The Layout Tab allows for the importing of a layout xml file to apply to the product before it is sent to the selected fulfillment option. As an example, one could add a layout xml file that applies a one inch border on either side of an image. (ex. 8x10 print is sent as an 8x12 with a border on the left and right sides). To select the template file used, click on the Import button in the bottom, right corner and choose the properly formatted XML file to apply.
Price Tiers tab Settings
Every product can be configured for quantity pricing discounts for your customers. For example, one 4x6 print is $0.19, but if a customer purchases 10 or more, a discounted price of $0.17 is applied by offering an 11% discount.
To set up a tiered product pricing, please do the following:
- Click on the Add button within the Price Tiers tab.
- Set the Minimum products to 10 and Price to $0.17. The discount percentage is calculated automatically based on the base price.
- Click the OK button to save your price tier. You can edit existing price tiers by clicking the Edit button.
- Repeat for any additional price discounts you wish to setup based on quantity.
- When complete, click on the Save Changes option on the left panel.