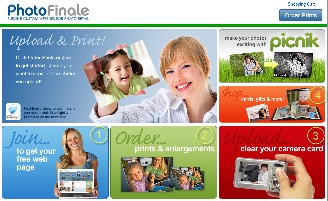
The logos for each Photo Finale Web website may be customized using Lab 50. The logo options are located in Store Management > Brand Settings and Logos. Select the brand you would like to edit, as there may be more than one, then click on the Logos tab to edit the individual ad placements. The logos and their corresponding placement on the website are shown on the right panel:
Brand Settings Logos on a Photo Finale Website and their corresponding lab settings Logos on a member’s page and their corresponding lab settings

Your store brand information is entered by default when you initially install Lab 50, but you can make changes to it
as necessary. The settings are as follows:
- Name: Name of your brand.
- Description: For multiple brands, such as Holiday theme.
- Email: Your Store Email.
- Phone: Store or main phone number.
- Fax: Store or main fax number.
- Website: Your primary website address.
- Contact Us Link: Link to contact us page on your website.
- Deleted: Mark the brand as deleted.
Linking the Logos to a product, category, or URL
The ads/logos may be configured to direct link to specific products, categories, or URLs.
To add a link, right-click on the logo listing in Lab 50, and a menu will appear to specify where the ad should connect.
If you want it to link to a product or category, you can find the link through the Product Catalog. The URL for products will be on the left side of the screen when you select the product from the list, and when you go to the properties of the category or subcategory you will be able to find the link there. Then, simply copy that URL into the Ad or Ads.
Important Info
Please note that all logo selections need to have a logo assigned to them with the correct resolution, and each uploaded with a unique file name even if the same image is to be used in more than one spot.