To add additional categories to the Default catalog:
- Right-click on the default catalog and select "Create Category".
- Type in a name for the new category, and press Enter.
- Continue to add Categories within the Catalog until you've created all the category options you would like available on the website.
| Advanced Tables - Table Plus |
|---|
| columnAttributes | style="text-align:center;" |
|---|
| align | right |
|---|
|
| Category Options | 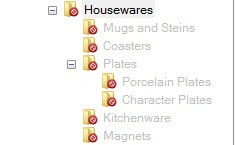
| Disabled Category Tree | 
| Disabled Sub-category |
|
Category Options:
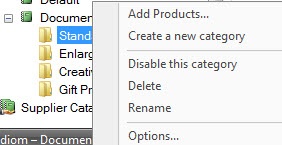
To view options available for customizing a category within a catalog, right-click on the category you wish to edit. The menu options are as follows:
- Add Products: Add products to be offered within the category.
- Create a new category: Create a new category within the category. This option is new with version 7.5 and is to mirror the product groupings available on the kiosk. Example: Housewares gift products divide into Mugs and Steins, Coasters, Plates, Kitchenware, and Magnets. These catagories also divide into further groups such as Porcelain Plates and Character Plates.
- Enabled/Disable this category: Enables or disables the category on Photo Finale web. You can disable entire categories or sub-categories within a category.
- Delete: Removes the category or sub-category.
- Rename: Renames the category or sub-category within the catalog.
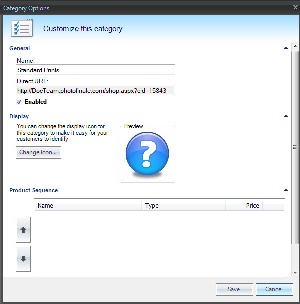
- Options: Opens a window to organize the products listed within the category. This window also provides a direct url link to the category for use in linking Start Page ads, and it provides a means of adding/changing icons for individual sub-categories.
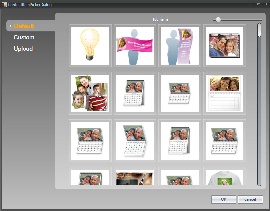
To change the icons associated with a category:
- Right-click on the category for which you would like to add/change an icon.
- Select the Options menu. The current icon, if one has been assigned, will appear in the preview window.
- Click on the Change Icon button, and the Category Icon Selection screen will open. The options on the left panel do the following:
- Default: Displays Lucidiom default icon set. These icons match the icons used in the APM software.
- Custom: Displays any icons that have been uploaded to your account.
- Upload: Allows you to add a new icon to your custom library.
4. Once you have selected an icon, press the Ok button.
**Note: If you hover over an icon, the full file name will be displayed.
| Advanced Tables - Table Plus |
|---|
| columnAttributes | style="text-align:center, style="text-align:center;" |
|---|
| align | center |
|---|
|
| 
| Category Options Window | Category Icon Selection |
|